BREAKING NEWS
Demo: http://stylishnewsblogger.blogspot.com/

Blogger Setting

Technology

Ads

Thứ Ba, 30 tháng 5, 2017

11. Website Infinite Main Color

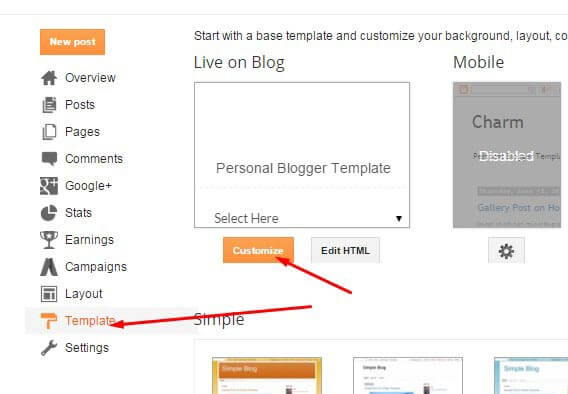
Access your blog Template > click Customize as shown in below Image:

colors

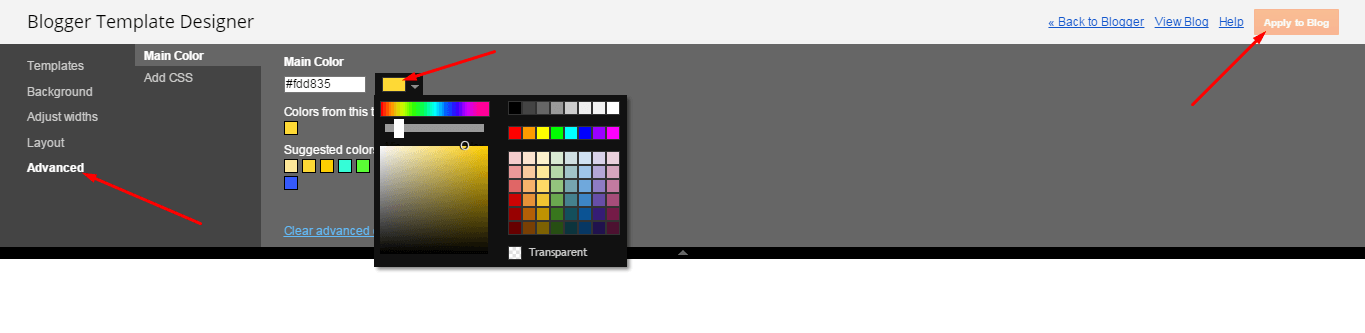
    Then goto ADVANCED and select any color you want for the whole website.
infinite

10. Sidebar Ads

10. Sidebar Ads

To add your ads code to the sidebar, you can just go the layout section and click on edit and paste your sidebar ads code, refer to the image.

sidebar ads

9. Post Section


You Can See in the post section on the website as shown in the below image.
post section
You can set these sections by just adding LABELS to this layout widget as shown in the third point.

post

fam


img

You just need to add LABELS of your posts which you can get from here:
labels
You Can See in the ad section on the website as shown in the below image.

You Can See in the post section on the website as shown in the below image.
screen

You can set this part by adding label to this layout widget.

footer

NOW Just add the LABEL of posts in these 4 sections from LAYOUT, and the posts will get shown on the homepage. Just add the LABEL as shown in below picture:

footer website


8. Slider


You Can See in the Slider on the template, to put your posts to the slider you need to give FEATURED as a label to the posts which you want to display on the slider.
The slider automatically works with the latest posts. It fetches 8 latest posts from your blog and shows them in the flipping slider.
NOTE: All your posts must contain some LABEL.

7. Ads on Header

You Can See in the Ads on top of the website, to put your ads you can follow the image below:
ads

Click on edit and write your ads code.

6. Setting up the menu

  1. On Blogger Dashbord Click Template
  2. Click Edit HTML
  3. Scroll down and Find this Code :

<nav class='nav-collapse' id='navtop'> 
<ul class='topmenu1' id='masthead'> 
  <li><a href='#'>Home</a></li> 
  <li><a href='#'>Download</a> 
  </li> 
  <li><a href='#'>Social</a> 
  </li> 
  <li><a href='#'>Features</a> 
    <ul> 
      <li class='dir'><a href='#'>Music</a></li> 
      <li class='dir'><a href='#'>Group</a> 
      </li> 
      <li><a href='#'>Sub Menu 3</a></li>
      <li><a href='#'>Sub Menu 4</a></li>
    </ul> 
  </li> 
  <li><a href='#'>Entertainment</a></li> 
  <li><a href='#'>Travelling</a></li> 
  <li><a href='#'>Contact</a></li> 
</ul> 
</nav>
4. Change # with yours URL link and text with your text.

5. Upload Logo


Access your blog Layout > click Edit link on Header widget
upload logo

In Configure Header window, input your Blog Title and Blog Description. If you want to upload your image logo, make sure you check Instead of title and description, then click Choose File and locate your logo file. And click Save button to finish.
upload


4. Main Blogger Setting


  1. On Blogger Dashboard Click Layout.
  2. Click Edit on Blog Posts Widget.
  3. Change it to look like that image.
  4. Click Save


Copyright © 2014 Stylish News Blogger. Designed by vietpro | vietpro